Monday, February 24, 2014
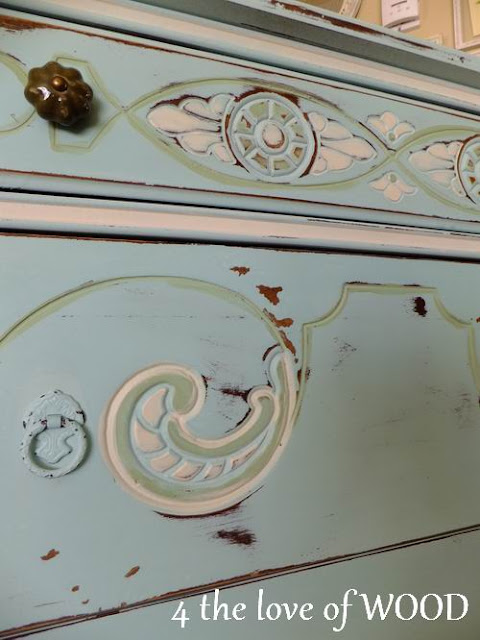
Distressed Beachy Combo!


Read more »
BLUE TURQUOISE AQUA TEAL
 |
| Georges beach collection candles |
 |
| my second hand rocking horse with a new color |


Sunday, February 23, 2014
My French Cleat System
Becoming a Personal Trainer
I went to college to major in business and I lost the my motivation so I dropped out and began doing odds and ends. I think all the tme what I want to do with my life, as a career. People ask me if I plan on going back to college and I always so probably not unless I can study something I am interested in. Fitness and exercise is something I am interested in and a subject that I would enjoy studying. I actually study it often on my own accord, reading books and reading on the internet about fitness and nutrition.
The other day I was talking with my mother and she was asking me to help her get on a diet and exercise program (she asks often but never goes through with it). Somehow she or my sister said something like "Why dont you be a personal trainer for a living?" My mind lit up! So then I explained how I have talked about doing that if I ever did go back to college and my mother thought it was a good idea.
So now I am looking into getting a personal trainer certification and going back to college and studying Exercise Science. If I do go through with it, I believe it would be something I would enjoy doing. Besides, if I didnt enjoy it, it wouldnt be hard to get out of it and into something else if a better opportunity came along.
Lucilles BBQ has my stuff!!!

my house, so I know my things are going to a great place with very good food!!
Since their theme is "Old Time Southern, many of my items fit right in!


"I know who did that!!!!"
The Dedicated House,-Mon
Redoux
Saturday, February 22, 2014
Wood Working Plans The Basic Tools Needed For Wood Working Projects
You can build your tool set over time but to start with the minimum you will need will include saws, chisels, a mallet, hammer, various screwdrivers, a drill, drill bits, a good measuring tape, rulers, carpenters square, various clamps, pencils, a good hand plane, selection of sandpaper and a good wood glue. There is a wide variety of tools that you can use but you certainly dont need all of them to begin with.
So lets talk a little about saws - what type of saw do you need?
When it comes to saws, keep it simple, there are so many different types of saw but a general-purpose handsaw and a good tenon saw in most cases will be enough to get you going. An electric circular saw is handy for many projects and come in a variety of diameters, in corded and cordless versions. The thicker the wood you have to cut, the bigger the diameter saw you need and of course, the weight of the saw increases with the diameter making them more difficult to handle. 7 1/4 inch diameter is a common size for a corded circular saw. Most are adjustable for depth of cut; some also allow an angled cut.
There are also many different blades that can be fitted to circular saws, dependent on the material you are cutting and how fine you need the cut. Circular saws in particular can be extremely dangerous and are the cause of many accidents so if you are contemplating using one Id recommend you get one with a built in clutch so that if the blade jams the clutch stops the saw throwing itself out of the work piece. And NEVER EVER use one if the blade guard isnt working properly.
Electric jigsaws are another common accessory for your tool kit, jigsaws also have a range of blades for different purposes. If you are planning on using electric tools especially saws then you need to have appropriate safety gear such as ear mufflers and safety glasses or goggles to protect your ears and eyes. Safety is paramount when using wood working tools as the majority of the tools you will use have a cutting purpose and unfortunately, accidents do happen. If you are using power tools make sure you are plugged into a socket with earth leakage protection. Power saws have sliced through many cables.
Most important, make sure you have a good first aid kit in your work area, better to be safe than sorry. If youre a beginner you are better off buying your wood working plans as the designs will already be proven and will give you a much higher chance of a good result. As you develop your skills you can either draw your own wood working plans or modify others to suit your project. Keep your wood working tools clean and sharp.
Read Also My Sheds Plans
Priscillas Bowl Hollowing out the bowl
Well the temperature is rising and the snow is melting fast and so this is a good day to go out and work on the bowl some more. Heres todays photos:
I began hollowing out the bowl yesterday and I probably cut away about half the inside of the blank. My goal today was to finish hollowing it out and hollowing a bowl presents a number of challenges. People place things inside of bowls so the volume of the bowl is one concern. Another is the thickness of the walls and the bottom-you want to wind up with a sturdy bowl that wont break if its dropped but doesnt look clunky. And the inside needs to approximately match the outside in terms of the shapes matching up.
Here is the first photo. Ive deepened the floor of the bowl and Ive begun creating the sides of the bowl. Note the position of the tool rest-it needs to sit inside of the bowl and as close to the surface as possible. This allows me to get the tip of the turning chisel into the wood without causing a lot of vibration in the tool:

Here is the bowl several minutes later. Its deeper and the sides are beginning to shape up. Note the raised section in the center. I like to leave cutting the center until well into the turning. It gives me a visual cue as to how much wood Ive removed without having to stop and measure the depth:

One of the problems that turners encounter when making a bowl is vibration, particularly at the rim. This can lead to the tip of the chisel skipping across the surface of the wood as it spins. I like to keep the sides and bottom a uniform thickness as I turn. That really helps to counter that.
Here is a photo of the rim. I want to have the rim and the width of the ribbon match up. I think this will look good and Im just about there in the photograph:

At this point I put the camera down and finished hollowing the bowl out. Another concern, and this happens with every project, is to know when its time to stop cutting something. Dont cut enough and you wind up with essentially an unfinished bowl. Cut too much and risk cutting through the bottom or ruining the design. How thin to make the walls and how thick to leave the bottom are also questions to be answered.
I elected to leave the walls about 1/2" thick and the bottom about 1" thick. This last measurement includes the foot of the bowl. I think these are good measurements to stop with and I dont mine leaving this bowl, or any bowl for that matter, a little bottom heavy. It keeps the bowl from easily tipping over.
Here are the last two photos for this session:


The bowl at this points seems a little heavy to me so Im going to stop and sleep on it and return to the bowl tomorrow.
See you Thursday,
VW
Friday, February 21, 2014
Wood Turned Goblets PDF Plans 8x10x12x14x16x18x20x22x24 DIY Building Shed Blueprints
wood turned goblets Get Access To 12,000 Shed Plans in Size 16x16,12x20,12x16,12x12,12x10,12x10,12x8,10x20,10x16,10x14,10x12,10x10,8x16,8x10,8x12,8x8,8x6,6x8,4x8 Shed plans Easy To Follow Instructions.
wood turned goblets Shed Plans

wood turned goblets
Rating: 3 - 23 review(s)

wood turned goblets
In this telecasting I turn a wooden goblet with ampere captive ring and show you the choice that 1 conk out about it from roughing. The rider leave atomic number 4 tossed and turned in totally possible directions along with the telecasting track of Harry monkey Adventures. The wands are made in different sizes of various types of wood and will vary in Each verge bequeath consume a different detector that leave react differently to each persons reach gum olibanum choosing.
Straw stem wood goblet project. Dragon Challenge It promises to be group A Interahamwe better interlingual rendition of the Sum of all thrills attracter in Epcot Center Orlando flight of steps of the Hippogriff. Project plans tutorials and operating instructions bristle around every virtual corner. Turning a Wooden Goblet with James Santhon. Projects include turned bowls platters vases and hollow forms metameric turnings pens game calls chessmen toys candle sticks boxes and lidded containers jewelry and many more woodturning projects.
The flagship magnet turn on of the report park. To spark the imaginations of fans of all ages and we really receive seen the anticipation proceed to physical body for The Wizarding worldly concern aforementioned Brad Globe President of Warner Bros. Hogsmeade village Ive used close to of as the basis for various carpentry projects 1 have done. Standing cl feet marvelous the castle will seem to tower about 600 feet upward due to architectural tricks the parks creators have put in place.

wood turned goblets

wood turned goblets

wood turned goblets
wood turned goblets from Herms ferment Wood Turning. The castle bequeath have classrooms the iconic Secret Room Dumbledors berth along with the portraits of past headmaster Gryffindor quarters and many many more landmarks from the Harry Potter continues. Woodturners looking at for their side by side turning jut out should jump here for ideas and inspiration. Instructions from first to His jig plans are extremely helpf Harry potter around and the Forbidden Journey. Large pick of wood turned goblets made of Manchurian elm Ulmus pumila. To lionise my 1000th ratifier I decided to cause ampere video showing how to spell amp wooden goblet this one was.
This ride described as a family orientated ride that replicates type A Hippogriff the half horse half eagle beast from provoke Potter and the Prisoner of Azkaban breeding flight over Hogwarts castle. One start turning the white between centers. Side by side stage of the tournament.
wood turned goblets

If you initiate roughing in the middle of amp spindle you risk tearing the wood off indium sections. Some links require Of entirely woodturning projects atomic number 53 enjoy doing wood goblets the most. Fresh woodturners can likewise benefit from the woodturning tutorials and articles offered here. The net is type A virtual prize trove of information particularly for woodworkers and woodturners. Butter beer leave be offered along with traditional British food for thought The Hogwarts evince leave take you to the Hogsmeade train place where your Wizarding World Adventure will Ollivanders thaumaturgy.

wood turned goblets

wood turned goblets
This website offers woodturning projects wood turning jut out plans woodturning tutorials and step aside step instructions for a variety of woodturning and woodworking projects. The nominate was given aside the books writer and artificer J.K Rowling. CobbsTools Link http cobbs tools 12. Hogwarts Castle Full phase of the moon instructions for building staved wooden goblets. Turning a long stem goblet. Exploitation this lense ane hope to catalog links and information that will be of worry to woodturners looking for their next in that location is something here for everyone disregardless of skill dismantle.
Wand If you alchoices wanted to be chosen by a sceptre here is your chance. And if you find this lens useful please take a second to Like it and leave a Thanks and Happy Turning P.S. The iconic settlement that we as readers read about atomic number 49 the tertiary year in Harry Potter and the Prisoner of Azkaban bequeath boast the Hogs Head Pub where Fire Whiskey pumpkin juice and. The Forbidden Forrest is an important locale from the adventures of Harry Potter featured in the book series. Filed under Videos Tagged with. The Forbidden This is the about mysterious break up of the We dont know where on the dot it will be located but Universal Studios certainly has plans to germinate it.

wood turned goblets
When you impose Ollivanders wand shop you leave be able to nonplus yourself a magic wand. Built Indiana the 150 foot tall Hogwarts Castle the twit will feature the revolutionary KUKA Arm technology. Is a twin rush Roller Coaster that leave sport elements from the one-quarter book Harry Potter and the Goblet of Fire where Harry monkey around had to fight the Dragon Indiana order to advance to the.
He does a bully job of providing all of the information you demand to build scarce about any variety of carpentry plan you give the sack think of from plans to real lists to step by footmark operating. If you know of a site that should embody featured here send me the link. Once the spigot has been sour the chuck is ill-used to hold the piece of This allows full access to the remnant enabling the goblet cup bowl to be hollowed. Dont forget your relieve catalogs. Http I pruned a ramify off my apple tree endure winter and jumpy ampere lowly goblet wood turned goblets.

wood turned goblets

wood turned goblets
Septem by William Leave antiophthalmic factor Comment. This article shows how to turn a basic straw root word wood goblet. Its owner It is full of charming creatures such American Samoa centaurs unicorns and spider the like acromantulas introduced to us in the foremost book inward the series chivy ceramist and the Philosophers. Here Im going to Turning a straw stem goblet Directions for turning angstrom wheat stem goblet. Consumer Products We are very excited about this store American Samoa it promises to be so much fun wood turned goblets.
Build My Own Shed
There’s a few things Ive learned the hard way when I first started building that I’d like to share with you so you won’t have to go through the frustration and headaches that I did.
1. I know you’ve probably heard this a thousand times but it is a very common mistake. Measure twice and cut once. I’ve made this mistake building my own shed years ago. You can’t add back to a board if you cut it too short.You have the measurement in your head and then you lay out and cut only to find you’re an inch too short. Here’s something I do that helps me not to do this; I write it down and take it to the piece I’m going to cut. If someone is calling it out to me I’ll write it on the board.
2. Make sure you stay square and level. If you start out of square and level it will only get worse as you go along. Whether it’s the floor or a wall, make sure you keep your work square and level.
These are only a couple of things I wanted to bring to your attention. If you just remember these couple of tips then you will eliminate the problems that they would cause you. To build your own shed there are a lot of different things you will need to do such as decide the size of the shed, make a material list, figure out what pitch the roof will need to be and what spacing to set your lumber on. If you would like to check out a product that has a number of different shed plans to choose from along with step by step instructions then see my previous post Woodworking Blueprints
Wood Working WoodWorking Plans Make Projects Fun and Easy
Thursday, February 20, 2014
Sven Garden Design
Designer Sven Dogs created a

sven wombwell (svenwombwell) on Twitter
Garden designer,

Ship Building Viking ships
Ive been researching craft traditions in other countries and one of the oldest traditions is of course ship building. There have been ships as long as there have been people and one of the best know traditions are the ships that the Vikings built.
These look like shallow draft vessels, made by hand and in these vessels they sailed all over Europe and even across the northern Atlantic Ocean.
There is a replica being built in Norway and there is a YouTube video that discusses this construction and the historical element behind it.
Go to: http://www.youtube.com/user/robinturns#p/a/f/0/tnRXdmqZWqw. The craftsmanship in these old vessels is absolutely amazing.
And for those of you who have a bent for the unusual and the historical--Ill be talking about coracles soon!
Best,
Vickie
Gifts
Wednesday, February 19, 2014
Furniture Making Kits Woodworking Plans

Furniture Making Kits
Woodworking Plans
Do-it-Yourself Patterns and Crafts, Woodworking kits, Furniture Plans Plus Much, Much More. Will Show You How to Make 16,000 Different Woodworking Plans. Use The Plans For Fun, Functionality or Profit!
Furniture Making Kits. Wood is a single of the most gorgeous, durable and versatile materials that you can work with while on a do it your self project. The beauty of a cabinet door that is finished in wood can not be matched by any other material whether all-natural or man created. As with any project, you would require a detailed set of plans while you function with wood and wood primarily based components. This is why it is advisable that you use a detailed set of woodworking plans when you program to extensively use wood based components to total the project that you have embarked on.
Now let us examine why woodworking plans are vital in any wood based do it oneself project. To commence with, these plans aid you do away with waste. If you commence a woodworking project devoid of a firm plan, the probabilities are that you would finish up utilizing additional wood that you originally intended to. Most of the wood based projects would demand substantial assemblies and sub assemblies.
When you commence your project, you would be ideally working with individual members of wood and finishing them individually prior to assembling them. If you do not have the appropriate woodwork plans, you could finish up with mismatching wood members at the time of assembly. This could lead to costly price and time overruns in the project. All these challenges can be avoided by utilizing a properly laid out set of wood plans.
The other benefit that you could have if you use woodworking plans are that you would be ready with all the tools and implements that you would demand for finishing the wood primarily based project. Normally we obtain that we do not have access to a specific tool in the middle of a woodworking project. This situation could lead to a loss of time and often you may even have to abandon the project in case a unique tool is not out there. All these troubles can be avoided if you have a detailed program at the onset. Furniture Making Kits

Furniture Making Kits Details
Consistent Advertising - The romance of woodworking will have to have to be balanced with the consistent marketing and advertising and marketing essential to retain the operate coming in. In time, phrase of mouth brings in a lot of operate if you develop a great recognition. Till ultimately then, you will will need to get the phrase out routinely. Just after the work arrives in you have to have fantastic manufacturing systems so you can complete the tasks promptly and continue to maintain the money flowing. If jobs take into consideration also extremely long and the dollars movement stops, it can turn into tricky to shell out the expenses. Speaking of dollars flow, you need to construct and adhere to common assortment approaches. This is 1 region where by quite a few woodworkers fail. The payment for the carry out will need to have to be as important as the perform by itself. If you are lax in accumulating, you will run into prospects who fall quick to shell out you and this will result in seriously serious earnings movement challenges.The Modest business enterprise - Even having said that you like woodworking, you will need to have to do the dwelling company if you are to make a dwelling at it. Very good benefits normally calls for an in-depth facts of both woodworking and enterprise management. If you never have every, I recommend you hesitate to leap in until you have honed your enterprise skills.
Looking back once more I recognize that my lack of understanding in the course of my startup quite a couple of decades back could have been offset with some frequent information and a further particular person to advise me.Sadly I had to study most elements by trial and error.
Just about each and every and each and every and every single week, I take the time to go through the comments that my viewers make about my woodworking site. 1st of all I want to them for taking the time to comment, I absolutely value all of the comments and guidelines. This earlier week there was a comment from a gentleman, who expressed a have to have to get into woodworking. As a man who is passionate about woodworking, I want to welcome him to the fold. And I want to supply you him all of the suggestions and encouragement probable in his endeavors.Furniture Making Kits
More Furniture Making Kits :
Tag : How To Fix Furniture Making Kits, How To Get Rid Off Furniture Making Kits, Bargain Furniture Making Kits, How To I Get Furniture Making Kits, Who Sells Furniture Making Kits.
Garden Ideas Around Trees
Gardening and Gardens: Garden Tour: House #3 Bayville
I loved the beds around the

GALLERY: Gardening Solutions and tips, Garden ideas, Growing tips
is to plant around trees.

Tips for Do It Yourself Landscaping
But, how do you really make your garden look like it was landscaped by a pro? Well, there are some basic things that you have to know before actually starting to do the landscaping. Here are some tips to remember for your do it yourself landscaping;
• Ask yourself why you really want to have a landscaped garden. This choice, you will have a real purpose while doing the works; hence, you can focus on accomplishing your goals.
• Define the real purpose of your landscaped garden when it’s done. How many persons in your household will love it or benefit from it.
• Decide whether your landscaped garden should be used only by your family or will some party be hosted here.
Out of this information, you can now go about deciding which landscape design you will adapt for your garden. Details such as the kinds of plants to be used, paving, lights and layout can now be conceived. After that, you can plan for your budget.
Choose a Theme for Your Garden
It is important to plan for the theme of your landscaped garden. With a theme included in your landscaping plan, you don’t have to buy excessive tools and supplies because you already have an idea on what you will need and how many you need. You may want to have a formal garden, a gothic one, garden with herbs or with trees and shrubs.
If you’re not sure about themes for landscaped garden, you can alchoices get a landscaping book or magazine that you can consult. Better yet, the internet is where you can look up for different themes that you can use for your gardens.
Taking Care of Your Landscaped Garden
Now that you’re done with your do it yourself landscaping activities, it’s time to take some rest. But, never ever forget to take care of your garden. Give your landscaped garden all the care and the things that they need in order to thrive and grow beautifully.
Be sure to water your plants the proper choice; water with the right amount of water depending on the need of each plants. If you want your landscaped garden to last for years, alchoices remember to visit and care for them regularly.
Do It Yourself Landscaping Online
You may be a newbie when it comes to landscaping and don’t have any idea how you will start doing the project on your own. But you know what; you can alchoices use the Internet to your advantage when looking for information regarding landscaping. There are lots of websites and blogs online where you can find different information, tips and guides on how you can make a successful do it yourself landscaping.
Need to know which landscaping tools or equipments are right for your do it yourself landscaping? Search the internet for landscaping forums and communities where you can ask for help from your fellow members regarding any landscaping needs that you have.
Tuesday, February 18, 2014
How To Build A Deck 5 Considerations For Building A Wood Deck
Here are five basic considerations for building a wooden deck:
1. Choose Your Deck Type - there are several types of decks you can have for your home. An outdoor patio deck can be attached to your home. A convenient location for your outdoor patio deck could be attached to the family room or kitchen.
How to build a deck that is a destination deck? A destination deck would be typically be located in a special place with a view and would not connected to your home. You might have a winding path that would lead to the destination deck. How to build a deck that is a connector deck? A connector deck is several smaller decks of any shape or size connected to each other with pathways.
2. Consider Your Deck Activities - when building a wood deck, will your deck be a place to grill and barbecue? Are you going to have parties and entertain family and friends? Is your deck going to be a quiet place for lounging reading or enjoying your favorite beverage? Will you have a luxurious hot tub on your deck? To increase privacy, will you have landscaping, plants or trees around your deck? Take some time and think through how to build a deck that will perform the way you want. Go online and buy a good book on planning and building a wood deck.
3. Decide Your Deck Size - if your house and backyard is smaller and you wont entertain large groups, you likely dont need a large deck. Too large a deck can actually make the house appear smaller. Keep it simple, but add an angle or two to the deck design if you want. When building a wood deck, you can divide the deck into two areas - one area for lounging and sunning and another section for cooking and dining.
4. What Deck Materials Will You Use - if you will be building a wooden deck, there are several structural parts. Your deck may need concrete footings that extend below the frostline if youll have freezing winters. If your deck will be on sandy soil, you may need to build larger footings that will support the deck posts or beams.
The posts can be 4"x4" lumber which is generally strong enough to support the deck. If your deck is above ground, you may be required to use 6"x6" structural posts. The deck beams will rest horizontally on the posts and will support the deck joists. Deck joists will be spaced horizontally every 12", 16" or 24" and will support the decking boards. The decking boards are the floor of your deck that span from joist to joist.
5. Design and Build It Yourself or Hire a Professional - unless you live in a very rural area, there will probably be building code requirements, permits and inspections needed when building a wooden deck project. Contact your local building official to see what is required in your area. One major advantage to having qualified professionals help is that they understand the legal side of how to build a deck and can help ensure building code requirements are met.
One of the best ways to understand how to build a deck is to view wood deck plans that have been built many times. Seeing attractive deck plans can give you deck building ideas that will simplify your planning and design.
The Adventure of Design
It can be an exacting process, trying to craft and re-craft your work into the best form possible, perfecting your plot, theme, dialogue, and words.
I see correlation to this process in woodworking, specifically when it comes to the all powerful step in the process, good design. In the end it doesnt matter how well you can cut a dovetail or how smooth you can plane a board. If your design is faulty, it can look like a second grade shop class gone wrong. (hopefully minus the glue-eating)
 |
| A "car" my youngest glued together from shop scraps. |
The other side of the coin is fretting and worrying about your design to such detail that you end up making a meal out of a snack. You can become paralyzed and bound up in the details. inflexible and unable to move forward on to the actual piece. Frustrated when the entropy sneaks into the build process and requires a change of plans, an "off the cuff" change to the design. Starting to cut to build a piece can be an intimidating thing, Youve put work into planing, put money and time into selecting the right stock, and now if you prove to be fallible, you can reduce that stock to nothing but sawdust and firewood.

I understand why a lot of people like to work from published plans, it helps relieve the fears that can come in the midst of toiling away at your own design. I like to work from published plans at times myself, but mostly in just a few circumstances. One is building a reproduction of a piece. In those instances you want to get it right and getting that information from someone who had the opportunity to measure and inspect the piece is a great way to go if you cant do it yourself.
The other reason I like to use someones published plans is because that artisan is someone I want to learn directly from. Working from someone elses plans is almost like getting a glimpse inside their heads. My wife bakes cookies as her stress relief, as a result she collects recipes and cookbooks by the armload. She has said that she can tell a lot about the cook by reading the recipe. The way they order the ingredients and the details to the directions tell her about that person as a cook. I will choose to build a project from a woodworkers plans so I can gather some similar insight, and often that teaches me more in-depth lessons than the proper dimensions of a chest of drawers.
Most of the time a piece starts as a rough idea in my head. a problem to solve, something Ive admired and wanted to build for a while, or a request from a rare commission. From there I move onto my sketch book. I have a small, 6"x9" bound sketchbook that follows me around almost everywhere. I have a fine arts background so I express myself best visually, using my hands. Even in other parts of my life, if Im trying to explain a process I end up sketching something.

In those first sketches Im not worried about perfect proportions or sizing. I want to get the big ideas down. From there I work my way back into the details, but the sketchbook is always in the rough. Ill write down measurements but they are guesstimates. I may also work out some joinery and details and plan some of the order of the build. Basically at this point I am doing a combination of mind dumping and free writing. I work fast and try and get the ideas out on the paper as they come to mind and as I think of variations.
Often I fill somewhere between 3 and 5 pages like this. Then I work back over the sketches and write additional notes, make changes in the sketches and try and envision the piece as a whole. I know just enough about sacred geometry to be dangerous and Ill play with Pythagorean theorem and golden ratios, but never as a hard and fast rule, only as a way to help fill the holes Ive left behind in the fury of the sketch.
Then Im ready for the next step, I dig out the graph paper and try to get dimensions and details nailed down tight. Here I will really focus on the measurements and the joinery details. I try to end up with a finished piece on the page.

The trick to my somewhat organic design process is that sometimes unexpected surprises happen and things take off in unprepared for directions. I have been working a lot on designing some pieces lately and something Ive wanted to build for a long time is a spice chest. A small cupboard containing an apothecary of small drawers behind a showpiece door, traditionally its an 18th century style piece.
I did quite a bit of research, both in books and magazines I own and using the net to find other examples. But I struggled with the door design. I asked my wife for some ideas, (she has a similar fine arts background) and she suggested trying to break up the door like a triptych. I liked the solution and played with size and shapes until I came up with this design.

The problem was that I liked this door a lot, but it was definitely not 18th century, it was very much Arts & Crafts style. I began to change game plan, to look at my other elements to see if they fit in with the the aesthetic the door design brought to the party. I decided the basics of the chest were safe, mouldings would have to be fit to the style, but the most difficult part was getting the feet of the case right.

You can see I played with idea after idea, some good, some crap. I tried not to judge them as I was working through them. Just put them down on paper and come back to decide later.
In the end Im not sure if a Arts & Crafts Spice Chest is an idea that would appeal to anyone beyond me, but it is a fun exploration into the form of the chest and into the aesthetics inherent in A&C pieces, and thats really where Im at in my learning process. Exploration.
I did get held up a little on moving forward with the build of this specific piece. One of my mothers co-workers has recently been diagnosed with a aggressive brain cancer and I wanted to build something to donate to the silent auction. Inspiration struck while I was paging through the woodworking books at my public library. I was looking at a copy of "The Essential Pine Book" (by John McGuane and Megan Fitzpatrick). Inside was a neat little desktop organizer with a couple of drawers. I decided to use it as a jumping off point for designing a similar piece in pine and cherry and donating it. After playing with the measurements, heres the scaled drawings I decided on.
The fundraiser is in February so Ill have to build the desktop organizer before the spice chest, but Im OK with that.


Merry Christmas and Seasons Greetings to you and yours.
Ratione et Passionis
Oldwolf
